
TK's version deviates slightly from the traditional, adding a layer of tart dough to add stability and flavor. We all agreed it was a wonderful addition. Overall, our bakers found these cookies to be easy to make, once all the various components were ready to assemble. A bit time consuming, maybe, but definitely worth the effort.

Tania: 12 (large) cookies, standard bake, standard measure.
This cookie seemed quite involved, so I made sure to start early. One day, I made the pate sucree and candied orange peel. For the pate sucree, I left the butter out overnight, using Plugra again. I used the pommade technique, and it worked perfectly. I also made my own almond flour, by first blanching, peeling, and then grinding the almonds in my Vitamix. It worked like a charm! I did have to sift the flour a few times, as there were lots of little pieces left. In the future I would buy pre-made almond flour to save time.
This dough turned out great, so soft and buttery. In using the fraisage technique, the dough completely transformed. It started out kind of crumbly and after a few minutes became soft and supple and easy to work with. I popped it in the fridge for the next day. The orange peel was easy to make, although time consuming. I'm not sure it turned out properly, but I followed all the directions exactly.
Now, for the cookies: I rolled out the dough to the proper dimensions on a non-stick mat, but when I tried to transfer it to the pan, it fell apart. So instead, I re-rolled it out on the parchment paper cut to the size of the pan, then transferred the entire parchment to the pan intact. I baked it with another pan weighted with rice on top, but the dough wasn't cooked after 11 minutes. So I took off the second top pan and just baked it alone, until it was brown, about 9 more minutes. I guess the contact from the top pan prevented it from cooking.
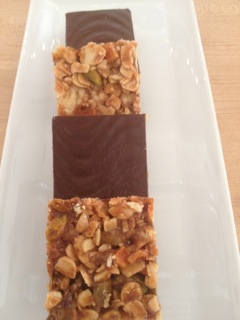
Making the candy/nut topping was easy. I chopped up the pistachios a bit just so they'd lie down flat. The orange peel lends a nice bright note to the otherwise rich taste. I melted Guittard 63% semisweet chocolate chips for the back coating, and used a scalloped pie server to make the designs on the back. It was easier than I expected, and beautiful!
Once all the elements were ready and in place, these were actually quite easy to make. I cut them into squares and they looked just like the picture in the book! I think my mom would really love these cookies, they're very European in style and taste.

20 cookies, metric measure, standard bake, 28 minutes
Wow these are really impressive cookies both in appearance and taste. The layers of nuts, tart base and chocolate coating makes this recipe pretty intensive and one definitely best done over several days. The traditional florentine cookie consists of just the caramelized nut mixture coated in chocolate but I have to say, Thomas Keller's addition of the tart base in the middle is genius. Not only is the sucree dough one of my favorite doughs aside from puff pastry, it really adds body to the cookie.
For the nut layer, we are to use candied orange peel which I made from scratch. Total prep time is about 30 minutes and then 1.5 hours for the peels to sit on the stove. I'd compare the procedure to that of making jam. Low and slow. I'm not sure if it's worth it necessarily for this cookie because there are so many other steps but I personally love to eat orange peel by itself, sprinkled with granulated sugar till it dries so it's like one of those orange slice candies but so much better. I just put the rest in a jar for snacking.
For the chocolate layer, I melted 72% dark chocolate instead of the requested 60% but it was fine. Using an offset spatula, you smooth it out over the surface of the sucree dough. It doesn't have to be perfect because then the magic happens. With the rectangular edge of an icing comb/spreader, you create a wave pattern with the chocolate. It's an "ooh, ahh" type of moment and once again Thomas Keller succeeds in providing a recipe that we can do well and actually have the outcome look like what is so beautifully photographed in the book.
These tasted delicious but I caramelized the nut mixture a bit too long due to my unreliable candy thermometer. It was a deep golden. Most of the nut mixture was fine but there were very small bits of hard caramel and the orange peel got a little bit too chewy. The texture wasn't too off. Other than that, a really fantastic cookie. Again this is an intense project to do so I'm not sure I'd repeat it, perhaps in a simpler form. I imagine myself doing a sucree dough base with the melted chocolate on top, followed by a sprinkling of the sliced almonds.

Alison:
This week's cookie was excellent! Although a bit labor intensive, it was well worth it! I used a conventional oven and I didn't have any candied orange peel, so I used crystallized ginger. I thought it might have been a stronger flavor than the peel, so I used less. You can barely tell that there is ginger in them, so if I did it again, I would use the full amount of the ginger.
The dough was fairly easy to deal with. I liked the method for making the pate sucree, but I may have used too much rice when par baking because it took my dough twice as long to bake. I used chocolate for the base, as I was not sure what the other option was (pretty sure that meant that it wasn't in my pantry). Luckily, my sweetie knew the tool for "combing" and was happy to pick one up at the hardware store for me. It took me one "do over" but I was able to add some decent waves.
All in all, a very impressive cookie! My sweetie declared that we could open a market stand and sell them immediately! I informed him that there was already a lovely establishment that sells them in Yountville, and that maybe we needed a road trip to check out the Mecca!
By the way, I got a 2-fer out of the recipe by using the scraps of leftover sucree dough to make raspberry thumbprint cookies. I used raspberry jam and a glaze made out of powdered sugar, almond extract and water.
Aaron:
I used metric measurements and a brand new traditional oven. I feel that we named this endeavor project we had little idea of what we were getting ourselves into and this cookie is a great example. You first must make candied orange rind, these are not the awful sugary citrus bits I picked out of baked goods as a child but honest to goodness delicious orange rind that we prepared from scratch. It is a great technique to know and a great addition to any baker's pantry but it does take some time.
After the orange is ready you then make the crust which isn't difficult but it is a new technique and required a new addition to my cupboard, almond meal! I think I may have to order a cabinet just for my baking supplies.
The nut topping was relatively easy to make and requires glucose which one of the team members purchased for us. The final step is to coat the back of the bar with Brune pâte à glacer, not an easy thing to find unless you have a friend that owns an amazing Patisserie, and I just happen to know that guy. I managed to candy my own citrus, purchase almond meal, bring home the glucose, and find Brune pâte à glacer but forgot to get the comb to make the waves on the back of the bar. I didn't let it upset me, much. I had come so far and the end was in sight. I used a serrated knife that gave a great texture to the cookie, it doesn't look exactly like the book, but you know what? This cookie is delicious. I will definitely make them again and almost anyone that tried them will want them when I do.

Leticia:
My
trek with this recipe began with the Candied Orange Peel. Making them
was a lengthy process but well worth the work. The second step was Pâte
Sucrée. I enjoyed making this very much. I like the way the dough came
together using the fraiser method. I skipped the step of wrapping the
dough and refrigerating
for 2 - 8 hours. I simply rolled out the dough to the 10 x 14 inch
rectangle then refrigerated for eight hours. I baked the crust with the
parchment paper and rice on top. Afterwards, I attempted to take off the
parchment paper with rice, I found it was too heavy, so I tipped the
pan to an angle a bit too much and the crust came crashing down on the
counter. I took a minute to decide how I was going to put it back on the
baking sheet but it began to crumble when I touched it. It then became firm and I decided to let my family break off pieces and eat as
cookies. Very delicious! I thought I would be discouraged, but it was
okay. I made another crust and was succesful. It didn't cook completely
in the center but I figured it would bake when I put it back in the oven
with the nut and fruit layer.
I was a bit nervous making the nut and
fruit layer. I just followed the instructions. Spreading it on the
crust was exciting to see the cookie
coming together. It was time consuming but not difficult at all. Once I
melted the chocolate (Guittard 63% cacao mass) I spread it on the
opposite side of the crust and I tempered it using the offset spatula
and immediately combed the chocolate in different directions.

What I like about this recipe are the different techniques used to make every component. Had I seen a recipe like this before I began this journey, I would have turned the page without considering making the Florentines. I also like that I learned to use a new ingredient such as the glucose and how to handle it.
What I like about this recipe are the different techniques used to make every component. Had I seen a recipe like this before I began this journey, I would have turned the page without considering making the Florentines. I also like that I learned to use a new ingredient such as the glucose and how to handle it.

These cookies were delightful. I enjoyed the hint of orange (I actually cut each candied orange slice 1/8 of an inch as instructed) which I believe made a difference. My family asked when I was going to make them again. Now that I have candied orange in the freezer, I won't think twice. I have already made a second batch of Pâte Sucrée also stored in the freezer.
I made the Florentines (x6 batch) 3 weeks ago. Started on Wednesday with the candied orange peel which was easy and oh so good. Made the Pate Sucree same night and let rest in fridge. Thursday rolled out the dough and baked. Mine also took much longer to set up...the rice ended up sticking to the dough where it slid over/under the parchment...checking to see of the dough was done at recommended time and the dough was sticking to the parchment...arg. removed rice and cooked 5-10 minutes longer. Not so much a pain if only making one tray - but I was making 6... finished the dough baking Thursday night, did my mise for the filling and went to bed. Friday morning started the filling - easy enough with a good thermapen. Baked well- had to keep an eye on the bubbling / browning. The Almonds ended up browning nicely. I would have liked a few more pistachios in there...may try that next time. Used the Brune chocolate on the back...that was tricky as I had not worked with it before. Some were great, some got messy - towards the last one I just did a smooth layer instead of the swirls.
ReplyDeleteI loved the cookies - friends loved them too! Some were a little hesitant of the candied orange - but I think that's what makes the cookie. Would make again - but use pie weights and maybe spray the parchment before laying over pate sucree to bake to keep from sticking and rice baking in to the dough... all great !
Thanks for sharing! I have been eyeing the Thermapen for a while. Feel free to email us as you bake and we'll post along with our write-ups.
DeleteSublime! Made these today and will make again! I couldn't find glucose paste, so used King Arhtur Flour sticky bun sugar (high glucose) with granulated sugar. I also didn't make my own peel... KAF sells excellent jarred candied orange peel and this saved some time. Used Belcolade bittersweet chocolate, also from KAF.
ReplyDelete